How Do I Delete All My Photos On Facebook
By
Herman Syah
—
Monday, September 3, 2018
—
Delete All Photos In Facebook
Facebook is not just great for getting in touch with friends. You could likewise use it to share your pictures and also experience your precious moments. It's simply that when it comes to deleting your images, you aren't allowed to erase them at one time. How Do I Delete All My Photos On Facebook: It's fairly a downer, isn't it? However, there's still a method to make your task a whole lot easier. You simply need to think of an excellent workaround.

Speaking of which, if you want to at the same time delete the pictures that you've uploaded on Facebook, after that all you should do is to adhere to the overview below.
How Do I Delete All My Photos On Facebook
ERASE MULTIPLE PHOTOS ON FACEBOOK SIMULTANEOUSLY
Step 1: Sign in to Facebook utilizing your e-mail and also password.
Action 2: When you're visited, go to your profile (timeline) and afterwards click the "Photos" tab that is located right below your cover photo. This will take you to the web page where you could check out of all your uploaded images.

Action 3: On your "Photos" web page, you'll be able to see all your uploaded images. Just select any kind of picture that you wish to erase then hover your mouse on it. You'll after that see some options like "add comment", "like", etc. Simply click the pencil symbol on the top-right corner of your chosen image then proceed to the next step.

Tip 4: Right after you click the pencil icon, a drop-down menu will show up. On the drop-down menu, pick the option for "Move to other Album". This way, you'll be able to move the photo to a new Album. You'll then be asked whether to relocate the image on an existing Album or a brand-new Album. Once more, choose the drop-down menu and click "Create Album". After you have actually made your option, click "Move Photo".

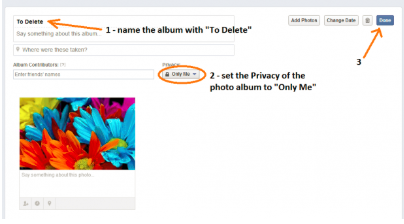
Step 5: A brand-new page will certainly pack and also you'll be asked to rename your new Album. For tag objectives, just call your new Album with "To Delete". Obviously, you're complimentary to choose a name that you like. You need to likewise transform the Album personal privacy to "Only Me". By doing this, no person else other than you will be able to watch the photos that you wish to remove. When you're completed, click "Done".
Step 6: Now that you've developed a brand-new Album, you can start moving every one of the pictures that you wish to delete to that brand-new Album. To do so, simply go back to your major "Photos" page as well as pick a photo then duplicate the 3rd step (see Step 3). On the drop-down menu, choose "Move to other Album" to move the picture to your "To Delete" Album.

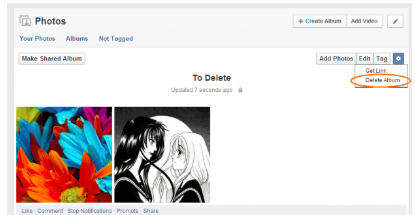
Step 7: After you have actually relocated every one of the pictures that you wish to remove, watch your "To Delete" Album then click the "Settings" switch on the top-right portion of your Album web page. On the sub-menu, click "Delete Album" after that validate your option.
To ensure that's it. You have effectively removed multiple images on Facebook at once. Simply bear in mind that you could not use the same method to your profile images in addition to to your cover images. If you wish to get rid of these pictures, after that you have no other selection but to remove them one at a time.
Speaking of which, if you want to at the same time delete the pictures that you've uploaded on Facebook, after that all you should do is to adhere to the overview below.
How Do I Delete All My Photos On Facebook
ERASE MULTIPLE PHOTOS ON FACEBOOK SIMULTANEOUSLY
Step 1: Sign in to Facebook utilizing your e-mail and also password.
Action 2: When you're visited, go to your profile (timeline) and afterwards click the "Photos" tab that is located right below your cover photo. This will take you to the web page where you could check out of all your uploaded images.
Action 3: On your "Photos" web page, you'll be able to see all your uploaded images. Just select any kind of picture that you wish to erase then hover your mouse on it. You'll after that see some options like "add comment", "like", etc. Simply click the pencil symbol on the top-right corner of your chosen image then proceed to the next step.
Tip 4: Right after you click the pencil icon, a drop-down menu will show up. On the drop-down menu, pick the option for "Move to other Album". This way, you'll be able to move the photo to a new Album. You'll then be asked whether to relocate the image on an existing Album or a brand-new Album. Once more, choose the drop-down menu and click "Create Album". After you have actually made your option, click "Move Photo".
Step 5: A brand-new page will certainly pack and also you'll be asked to rename your new Album. For tag objectives, just call your new Album with "To Delete". Obviously, you're complimentary to choose a name that you like. You need to likewise transform the Album personal privacy to "Only Me". By doing this, no person else other than you will be able to watch the photos that you wish to remove. When you're completed, click "Done".
Step 6: Now that you've developed a brand-new Album, you can start moving every one of the pictures that you wish to delete to that brand-new Album. To do so, simply go back to your major "Photos" page as well as pick a photo then duplicate the 3rd step (see Step 3). On the drop-down menu, choose "Move to other Album" to move the picture to your "To Delete" Album.
Step 7: After you have actually relocated every one of the pictures that you wish to remove, watch your "To Delete" Album then click the "Settings" switch on the top-right portion of your Album web page. On the sub-menu, click "Delete Album" after that validate your option.
To ensure that's it. You have effectively removed multiple images on Facebook at once. Simply bear in mind that you could not use the same method to your profile images in addition to to your cover images. If you wish to get rid of these pictures, after that you have no other selection but to remove them one at a time.